1. Class
1.1 类的由来
ES5中生成实例对象依靠的时构造函数,在ES6中引入了类的概念
// ES5
function Point(x, y) {
  this.x = x;
  this.y = y;
}

Point.prototype.toString = function () {
  return '(' + this.x + ', ' + this.y + ')';
};

var p = new Point(1, 2);

// es6
class Point {
  constructor(x, y) {
    this.x = x;
    this.y = y;
  }

  toString() {
    return '(' + this.x + ', ' + this.y + ')';
  }
}
类的所有方法都定义在类的prototype属性上面。
class Point {
  constructor() {
    // ...
  }

  toString() {
    // ...
  }

  toValue() {
    // ...
  }
}

// 等同于

Point.prototype = {
  constructor() {},
  toString() {},
  toValue() {},
};
因此,在类的实例上面调用方法,其实就是调用原型上的方法。
class B {}
const b = new B();

b.constructor === B.prototype.constructor // true
1.2 constructor()
constructor()方法是类的默认方法,通过new命令生成对象实例时,自动调用该方法。一个类必须有constructor()方法,如果没有显式定义,一个空的constructor()方法会被默认添加。constructor()默认返回一个实例对象,但是完全可以返回另一个对象
class Foo {
  constructor() {
    return Object.create(null);
  }
}

new Foo() instanceof Foo
// false
1.3 类的实例化
使用new关键字来进行类的实例化
class Point {
  constructor(x, y) {
    this.x = x;
    this.y = y;
  }
  z=1;
  sub(){
      return this.z;
  }
  toString() {
    return '(' + this.x + ', ' + this.y + ')';
  }
}

var point = new Point(2, 3);

point.toString() // (2, 3)

point.hasOwnProperty('x') // true
point.hasOwnProperty('y') // true
point.hasOwnProperty('toString') // false
point.__proto__.hasOwnProperty('toString') // true
类的所有实例共享一个原型对象__proto__,所以可以通过实例为类增加方法,影响到所有实例
var p1 = new Point(2,3);
var p2 = new Point(3,2);

p1.__proto__.printName = function () { return 'Oops' };

p1.printName() // "Oops"
p2.printName() // "Oops"

var p3 = new Point(4,2);
p3.printName() // "Oops"
实例的属性也可以写在构造函数的上面,代码看上去更清晰,注意属性是定义在实例上的,而不是在原型上
class foo {
  bar = 'hello';
  baz = 'world';

  constructor() {
    // ...
  }
}
1.4 getter、setter
与 ES5 一样,在“类”的内部可以使用get和set关键字,对某个属性设置存值函数和取值函数,拦截该属性的存取行为。
class MyClass {
  constructor() {
    // ...
  }
  get prop() {
    return 'getter';
  }
  set prop(value) {
    console.log('setter: '+value);
  }
}

let inst = new MyClass();

inst.prop = 123;
// setter: 123

inst.prop
// 'getter'
1.5 静态方法
类相当于实例的原型,所有在类中定义的方法,都会被实例继承。如果在一个方法前,加上static关键字,就表示该方法不会被实例继承,而是直接通过类来调用,这就称为“静态方法”。注意,如果静态方法包含this关键字,这个this指的是类,而不是实例。
class Foo {
  static bar() {
    this.baz();
  }
  static baz() {
    console.log('hello');
  }
  baz() {
    console.log('world');
  }
}

Foo.bar() // hello
父类的静态方法,可以被子类继承。静态方法也是可以从super对象上调用的。
class Foo {
  static classMethod() {
    return 'hello';
  }
}

class Bar extends Foo {
  static classMethod() {
    return super.classMethod() + ', too';
  }
}

Bar.classMethod() // "hello, too"
1.6 静态属性
class MyClass {
  static myStaticProp = 42;

  constructor() {
    console.log(MyClass.myStaticProp); // 42
  }
}
1.7 私有方法和属性
在属性和方法前加入#表示为私有,只能在类内部使用,注意在类中a和#a是不同的属性
class IncreasingCounter {
  let count = 0;
  get value() {
    console.log('Getting the current value!');
    return this.count;
  }
  increment() {
    this.#count++;
  }
}
const counter = new IncreasingCounter();
counter.count // 报错
counter.count = 42 // 报错
class Foo {
  let a;
  let b;
  constructor(a, b) {
    this.a = a;
    this.b = b;
  }
  sum() {
    return this.a + this.b;
  }
  printSum() {
    console.log(this.sum());
  }
}
1.8 in
用来判断一个属性是否在指定的对象或其原型链中,对于判断私有变量,in只能用在类内部。
class A {
  let foo = 0;
  static test(obj) {
    console.log(foo in obj);
  }
}

class SubA extends A {};

A.test(new SubA()) // true
1.9 静态块
在类的内部设置一个代码块,在类生成时运行且只运行一次,主要作用是对静态属性进行初始化。以后,新建类的实例时,这个块就不运行了。
class C {
  static x = ...;
  static y;
  static z;

  static {
    try {
      const obj = doSomethingWith(this.x);
      this.y = obj.y;
      this.z = obj.z;
    }
    catch {
      this.y = ...;
      this.z = ...;
    }
  }
}
2. 类的继承
2.1 简介
使用extends关键字来继承
class Point {
}

class ColorPoint extends Point {
  constructor(x, y, color) {
    super(x, y); // 调用父类的constructor(x, y)
    this.color = color;
  }

  toString() {
    return this.color + ' ' + super.toString(); // 调用父类的toString()
  }
}
在ES6中,构造函数必须先执行父类的构造函数,也就是“继承在前,实例在后”,只有在调用了父类的构造函数后,才有自己的this对象
2.2 私有变量的继承
父类所有的属性和方法,都会被子类继承,除了私有的属性和方法。
如果父类中定义了私有变量的set、get方法,那么子类可以调用
class Foo {
  let p = 1;
  getP() {
    return this.p;
  }
}

class Bar extends Foo {
  constructor() {
    super();
    console.log(super.p); // Unexpected private field
    console.log(this.getP()); // 1
  }
}
2.3 静态属性和静态方法的继承
父类的静态属性和静态方法,也会被子类继承。
class A { static foo = 100; }
class B extends A {
  constructor() {
    super();
    B.foo--;
  }
}

const b = new B();
B.foo // 99
A.foo // 100
这里面的拷贝是浅拷贝
2.4 Object.getPrototypeOf()
获取对应子类的父类
class Point { /*...*/ }

class ColorPoint extends Point { /*...*/ }

Object.getPrototypeOf(ColorPoint) === Point
// true
2.5 super()
super这个关键字,既可以当作函数使用,也可以当作对象使用。在这两种情况下,它的用法完全不同。
第一种情况,super作为函数调用时,代表父类的构造函数。ES6 要求,子类的构造函数必须执行一次super函数。
第二种情况,super作为对象时,在普通方法中,指向父类的原型对象,所以对于实例属性,无法通过super访问;在静态方法中,指向父类。
class A {
  p() {
    return 2;
  }
}
A.prototype.x = 2;

class B extends A {
  constructor() {
    super();
    console.log(super.p()); // 2
    console.log(super.x) // 2
  }
}

let b = new B();
注意:ES6 规定,在子类普通方法中通过super调用父类的方法时,方法内部的this指向当前的子类实例。
class A {
  constructor() {
    this.x = 1;
  }
}

class B extends A {
  constructor() {
    super();
    this.x = 2;
    super.x = 3;
    console.log(super.x); // undefined
    console.log(this.x); // 3
  }
}

let b = new B();
实例化B时,调用A的构造函数,里面绑定的this是子类,所以在A中没有x这个属性
2.6 类的 prototype 属性和__proto__属性
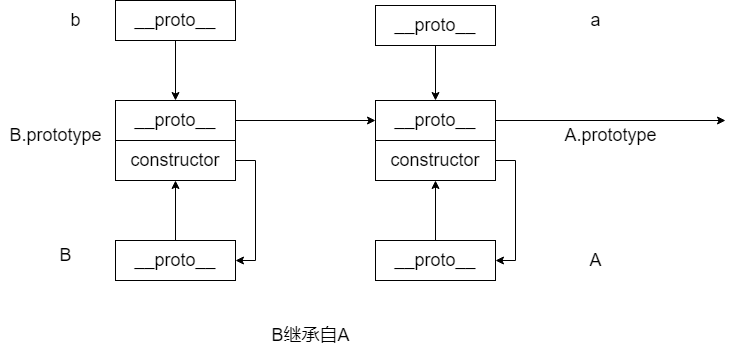
大多数浏览器的 ES5 实现之中,每一个对象都有__proto__属性,指向对应的构造函数的prototype属性。Class 作为构造函数的语法糖,同时有prototype属性和__proto__属性,因此同时存在两条继承链。
(1)子类的__proto__属性,表示构造函数的继承,总是指向父类。
(2)子类prototype属性的__proto__属性,表示方法的继承,总是指向父类的prototype属性。
class A {
}

class B extends A {
}

B.__proto__ === A // true
B.prototype.__proto__ === A.prototype // true
这两条继承链,可以这样理解:作为一个对象,子类(B)的原型(__proto__属性)是父类(A);作为一个构造函数,子类(B)的原型对象(prototype属性)是父类的原型对象(prototype属性)的实例。
2.7 实例的 proto 属性
实例的__proto__等于类的prototype,都指向类的原型对象
var p1 = new Point(2, 3);
var p2 = new ColorPoint(2, 3, 'red');
// Point继承于ColorPoint

p2.__proto__ === p1.__proto__ // false
p2.__proto__.__proto__ === p1.__proto__ // true
原型链的理解

2.8 原生构造函数的继承
在ES5中继承内置对象会发现和原生对象行为完全不一致,是因为在ES5中,是“实例在前,继承在后”,子类无法获得原生构造函数的内部属性。在ES6中,可以实现定义自己的数据结构,可以带有自己的功能
class VersionedArray extends Array {
  constructor() {
    super();
    this.history = [[]];
  }
  commit() {
    this.history.push(this.slice());
  }
  revert() {
    this.splice(0, this.length, ...this.history[this.history.length - 1]);
  }
}

var x = new VersionedArray();

x.push(1);
x.push(2);
x // [1, 2]
x.history // [[]]

x.commit();
x.history // [[], [1, 2]]

x.push(3);
x // [1, 2, 3]
x.history // [[], [1, 2]]

x.revert();
x // [1, 2]
这个例子实现了一个带有历史版本的数组